
Stove Installation
Imagine… you are sitting back listening to the crackling sound of burning logs and the comforting warmth that this is bringing to your home. It’s no surprise that so many homeowners are drawn to the idea of installing one. But how does the installation process work? Is it something you can do yourself? And what should you have in place before getting started?
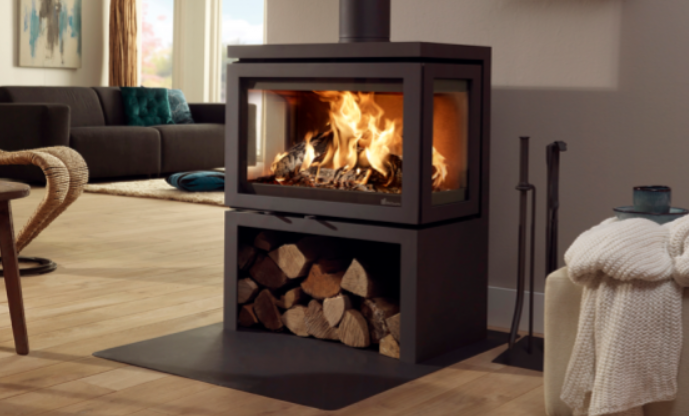
If you’re curious about what’s involved in fitting a wood-burning stove, we’ve got you covered. From choosing the right location and ensuring adequate ventilation to installing the flue system and preparing the hearth, there are several important steps to consider. While a DIY approach might be tempting, professional installation is highly recommended to guarantee safety and full compliance with building regulations. Here’s what you need to know to make your home stove-ready and enjoy the warmth in complete peace of mind.
Stove installation is a key step in ensuring your wood, multi-fuel, gas, or pellet stove operates safely, efficiently, and in line with building regulations. Whether you’re upgrading your heating system or installing a stove for the first time, it’s essential that the process is carried out correctly—ideally by a qualified professional.
Key Steps in Stove Installation:
- Site Assessment: A professional installer will inspect the room, check for ventilation requirements, assess proximity to combustible materials, and ensure your existing chimney (if any) is suitable for stove use.
- Hearth Preparation: A non-combustible hearth must be used beneath the stove. It should meet size and thickness regulations, protecting the floor and surrounding area from heat and falling embers.
- Chimney or Flue System: If a chimney is already in place, it must be inspected and possibly lined with a flexible flue liner. If there's no chimney, a twin-wall flue system can be installed to safely vent smoke and gases outside.
- Distance to Combustibles: Proper clearance around the stove must be maintained. If needed, heat shields can reduce the required distances to nearby walls or furniture.
- Ventilation: Adequate airflow is essential, especially for airtight or highly insulated homes. In some cases, an external air supply may be required.
- Connection & Commissioning: The stove is then connected to the flue system, sealed, and tested to ensure safe and efficient operation. A carbon monoxide detector must also be installed in the room as per regulations.
- Certification: In the UK, stove installations must comply with Building Regulations Approved Document J. A HETAS (or Gas Safe, for gas stoves) registered installer can self-certify the work and provide a certificate of compliance.
Important Notes:
- Never install a stove yourself unless you’re qualified and fully aware of local regulations.
- Incorrect installation can lead to smoke leakage, poor performance, chimney fires, or even carbon monoxide poisoning.
- Always use a certified professional for peace of mind and insurance compliance.
If you’re buying a stove from Stovebay.com, we recommend speaking to a trusted installer early in the process so you're fully prepared with the right stove, hearth, and flue setup for your home.
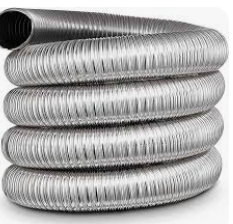
Flexible Flue Liner Installation
Installing a stove into an existing chimney with a flexible flue liner is a common and efficient way to ensure your wood-burning or multi-fuel stove is vented safely through an existing chimney. Here's a step-by-step overview of how it typically goes down. If you're doing it yourself, make sure you follow local building codes, or better yet, consult a professional — especially for solid fuel appliances, which can be risky if not installed correctly.
What You’ll Need:
- Wood-burning or multi-fuel stove
- Flexible stainless steel flue liner (grade 316 or 904 for solid fuel)
- Flue liner adapter or stove pipe connector
- Chimney cowl (like a rain cap or anti-downdraft cowl)
- Register plate or closure plate
- Insulation (optional but recommended — like vermiculite)
- Fire cement, sealant, and fixings
- PPE: gloves, goggles, dust mask
Step-by-Step Installation:
-
1. Prep the Chimney
- Get the chimney swept professionally to remove any soot or debris.
- Inspect for any structural issues or blockages.
- Measure the height of the chimney and order the correct length of flue liner.
-
2. Drop the Liner
- Feed the flexible liner down from the chimney pot at the top of the stack (usually easier than pulling it up).
- Make sure the liner is installed with the arrow pointing downwards — this ensures smoke and creosote flow the right direction.
- Have someone at the bottom help guide it through the opening.
-
3. Connect the Liner to the Stove
- Use a stove pipe to liner adapter to join the black stove pipe (from the stove) to the stainless liner.
- Seal the joint with fire cement or a high-temp sealant.
- Fit the pipe so it goes as vertically as possible with minimal bends (ideally no more than 2 bends at 45° max).
-
4. Fit a Register Plate
- This is a metal plate that seals the bottom of the chimney around the stove pipe.
- It keeps heat in the room and stops debris falling onto the stove.
-
5. Top Out the Chimney
- At the top, connect a chimney pot and cowl (if not already in place).
- Secure the liner to the pot with a top plate, clamp, and rain cowl combo kit.
-
6. (Optional) Insulate the Liner
- Fill the gap around the liner with loose-fill insulation (like vermiculite) to improve draw and reduce condensation.
- Not always required — depends on the chimney's construction and regional regulations.
-
7. Test and Sign Off
- Light a small test fire and check for smoke leaks or poor draw.
- In many areas, this install needs to be signed off by a HETAS engineer (UK) or equivalent authority.
- Alternatively, you may need to notify your local building control if doing it DIY.
Safety Tips:
- Always install a carbon monoxide alarm in the same room as the stove.
- Ensure proper ventilation — some stoves require external air vents.
- Follow manufacturer instructions to the letter.
Select The Correct Parts
1. Flue Liner Sizing & Grade
Diameter:
- Typically 5" (125mm) or 6" (150mm).
- 6" is standard for most wood-burning stoves.
- You can only use 5" if your stove is DEFRA-approved (UK) for a smaller flue.
Grade:
- 316L stainless steel: Good for wood-only use. Affordable and reliable.
- 904L stainless steel: Best for multi-fuel or heavy use. More corrosion-resistant (especially for coal).
2. Chimney Cowl (Top Piece)
Choose based on what issues you're solving:
| Type | Best For |
|---|---|
| Rain Cap | Basic weather protection |
| Anti-Downdraft | Helps reduce smoke blowing back down chimney |
| Bird Guard | Stops birds nesting |
| Spinner Cowl | Uses wind to improve draft (not always needed) |
| Pot Hanger Cowl | Attaches liner to chimney pot — neat install |
Best all-rounder? A Pot Hanger Cowl with rain/bird guard — no drilling into the stack, neat, and easy.
3. Register Plate
- Choose metal or steel, with cut-outs for the stove pipe and optional inspection hatches.
- Needed to seal the chimney base and support any insulation above.
- Can be DIY-cut or bought to size.
4. Stove Pipe & Adapter
- Single-wall black stove pipe goes from the stove to the liner adapter.
- Use a flex-to-rigid adapter or inox-to-black connector to link pipe to liner.
- Sealed with fire cement or high-temp silicone.
5. How Tall Should My Flue Be?
- Ideally 4.5 meters (15 feet) from stove to top of flue.
- Must be at least 600mm above the ridge of the roof (UK building regs).
- Taller flue = better draft.
Twin Wall Flue
No chimney? No problem…
So you're going twin wall flue instead of using an existing chimney? That’s a solid choice if you don’t have a masonry chimney or want to position the stove somewhere new (like a corner of the room or in a cabin/outbuilding). Twin wall systems are insulated, safe, and designed to pass through ceilings, walls, or roofs.
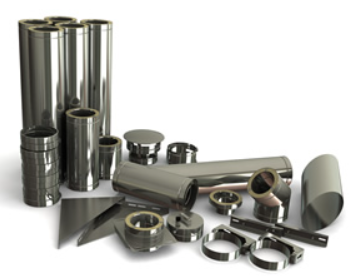
Twin Wall Flue Stove Installation – Overview
This system involves double-skinned, insulated stainless steel pipe that can safely pass through walls/roofs and stay cool on the outside while maintaining a hot core for efficient draw.
Main Components:
- Stove
- Black stove pipe (single-wall) — short length from stove to first twin wall section.
- Stove pipe to twin wall adapter
- Twin wall insulated flue — 5" or 6" internal usually
- Support brackets — wall, floor, or roof mounted
- Firestop plate — for ceiling or floor penetrations
- Roof flashing — seals where the flue exits roof
- Storm collar — fits over flashing to shed water
- Chimney cowl/cap — rain cap or anti-downdraft
Installation Path Options:
- Flue exits vertically from stove, passes through upper floor and roof.
- Best for draft (heat rising straight up).
- Needs firestop and boxed-in casing at each floor it passes.
- Stove pipe connects to wall exit.
- Twin wall passes through wall via a wall sleeve and wall support, then runs vertically up the exterior wall.
- Common in outbuildings or homes where you want minimal internal disruption.
Key Regulations & Guidelines:
| Component | Rule / Guidance |
|---|---|
| Distance from combustibles | Usually 50mm for twin wall |
| Flue height | Min. 4.5m total flue for good draft |
| Roof clearance | Must exit 600mm above ridge or 2.3m horizontally from nearest roof |
| Minimum vertical rise before bends | At least 600mm from stove before any bends |
| Bends | No more than 2 x 45° bends in total |
| Ventilation | Required in some cases (room sealed or external air kit can help) |
Step-by-Step Overview (Twin Wall):
- 1. Place stove on non-combustible hearth
- 2. Fit short length of black single-wall pipe to stove
- 3. Attach single-to-twin wall adapter
- 4. Begin stacking twin wall pipe vertically
- 5. Secure with brackets every 1.8–2m (or as specified)
- 6. If exiting through a wall or roof:
- Use firestop plate and ventilated ceiling plate
- Seal roof with flashing + storm collar
- 7. Fit a rain cowl on top
- 8. Test and commission the stove (HETAS engineer or building control approval if DIY)
Optional Extras:
- Wall-mounted supports
- Telescopic pipes for adjustability
- Inspection tees for easy sweeping
- External air kits (for airtight homes or log cabins)
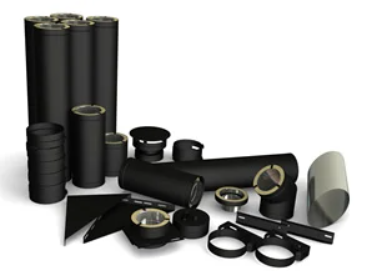
Benefits of a Twin Wall Flue System
A twin wall flue system offers several solid benefits over traditional chimney or single-wall flue setups — especially when flexibility, safety, and efficiency matter. Here’s a breakdown of the key advantages:
1. No Existing Chimney Needed
Ideal for modern homes, extensions, cabins, or outbuildings. Lets you place a stove anywhere — corner of a room, against a flat wall, or even in the middle of a space.
2. Built-In Safety
Insulated core keeps flue gases hot inside and external surface cool. Safe to pass through walls, ceilings, and roofs without risk to surrounding materials (with correct clearances). Meets building and fire safety regulations for combustibles.
3. Improved Efficiency
The insulation keeps flue gases hotter = stronger, more consistent draft. Helps the stove burn more cleanly and reduces risk of condensation or tar build-up (especially when starting a fire).
4. Modular and Easy to Install
Twin wall systems are modular — they just slot and twist-lock together. Can be built up vertically or angled (with 15° or 45° bends). Suitable for both internal and external runs.
5. Fewer Draft Issues
Because it retains heat so well, it’s less likely to suffer from cold chimney syndrome (where cold air blocks smoke from rising). You get a quick light and steady burn.
6. Weather-Resistant (Outside Installs)
High-quality stainless steel, sealed joints, and rain cowls keep the system weatherproof. Long-lasting and corrosion-resistant, especially with 316L or 904L stainless.
7. Clean Aesthetic
Looks sleek and modern, especially when installed externally with matching brackets. Can be boxed in internally or left exposed for an industrial look.
8. Can Be Self-Installed
Twin wall flue kits are designed for DIY installation (in many countries, with Building Control notification if not signed off by a professional). Less disruptive than building or modifying a chimney.
9. Cost-Effective vs Chimney Liner
While more expensive than a flexible liner, it can be cheaper overall if you don’t have a chimney at all (no structural work required). More energy-efficient, so better for fuel savings over time.
Cost Comparison Summary
| Installation Type | Estimated Total Cost |
|---|---|
| Twin Wall Flue System | £800 – £1,000+ |
| Flexible Flue Liner | £300 – £500 |
Which Option Should You Choose?
Choose a Twin Wall Flue System if:
- You don't have an existing chimney.
- You prefer an external installation.
- You want a system that can pass through walls, ceilings, or roofs safely.
Choose a Flexible Flue Liner if:
- You have an existing chimney.
- You prefer a more cost-effective solution.
- You're installing a stove in a location where a twin wall system isn't feasible.
If you need assistance selecting the right components or estimating the total cost for your specific installation, feel free to provide more details about your setup!
We're here to help…
For all inquiries please contact:
Email: sales@stovebay.com
Call us Mon - Fri | 9:30AM - 5.30PM
UK: 028 66 34 25 92 | ROI: +44 28 66 34 25 92
We're here to help with expert advice and support throughout the process.
Stovebay.com
Wood & Solid Fuel Stove Maintenance Guide